Getting Data onto my new Drobo using RoboCopy
Building out a new storage platform
- My name is Kevin and I’m a serial storage hoarder
- The New Drobo build out
- Getting the data over (or how I learned to love ROBOCOPY)
- Backup and such.
- … and a media injection machine?
Migrating data on the cheap – using RoboCopy
Copying data is something that – on the face of it – is a very simple thing. We drag, drop, done. Except it isn’t that easy some days. When dealing with bulk data volumes, or even volumes with lots of nested folders, Windows file copy has been known to die halfway through without trying.
And Mac users can stop laughing too. I’ve more than my fair share of file copy issues those devices too.
Windows File Copy is a pain in some respects. It’s quick & dirty and sometimes doesn’t work how you want it.
Rather than deal with that pain, I chose an inbuilt tool in Windows – ROBOCOPY – short for Robust Copy.
If you used to use XCOPY in DOS days – the following will be very familiar. It functionally replaces XCOPY whilst giving a lot more options.
The full documentation for it is at https://docs.microsoft.com/en-us/windows-server/administration/windows-commands/robocopy and I’d advise you to read it before using it – as it can be dangerous and can delete files as well as copy them.
DISCLAIMER
Before I go any further, it’s time for the annoying part of disclaimers and whatnot.
Whilst I’ve tested these instructions in various test harnesses and situations, your situation will be different from mine, and you WILL have to tweak the commands to your needs.
These instructions are provided on an “as-is” basis, with any warranty offered or implied, and are used AT YOUR OWN RISK.
In other words, if you use these instructions and it deletes your data – don’t come crying to me.
So how do I use ROBOCOPY?
There are ways to build a command line to help you. I tend to prototype my command lines in Notepad first before copying them into the Command Prompt
And don’t be afraid of the command prompt. Some of us grew up on it in the 1990s and earlier.
Firstly, you’ll need to open up a command prompt in Windows. This should be in your start menu, or just search for CMD.exe.
In its simplest form, a RoboCopy command can be as simple as this:
ROBOCOPY <Source> <Destination> <switches>
Lets break this down in a simple starting point, copying some photos to a external drive. So in the example below:
ROBOCOPY C:PHOTOS D:BACKUP
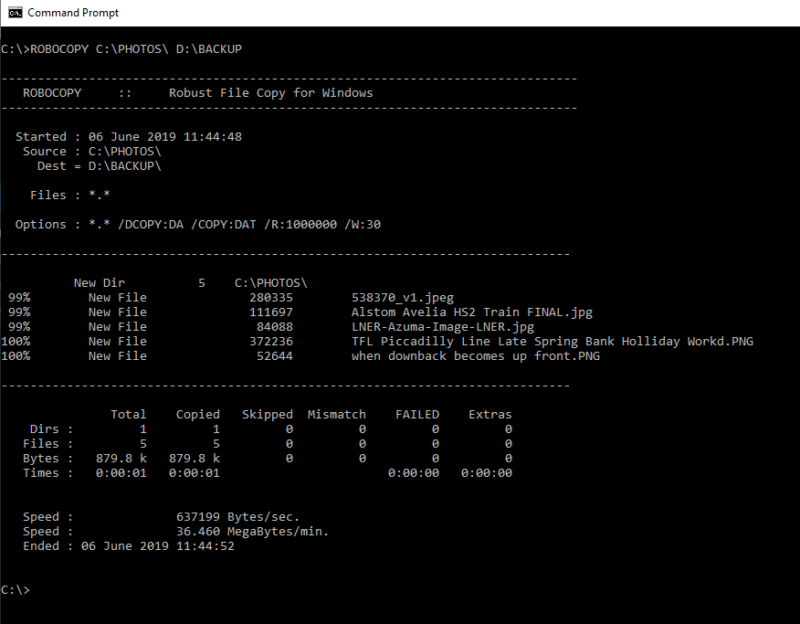
..Would copy the root contents of C:Photos to D:Backup on another disk
I said we would start slow 😉
We’ll add quotation marks now, as now we will be able to handle long file names and directories.
ROBOCOPY "C:PHOTOSTRIP PHOTOS" "D:BACKUP"
You can also use this to copy to network shares if you know the path as well. For example:
ROBOCOPY "C:PHOTOS" "\Serversharedbackup documents"
But copying files alone isn’t enough. Sometimes, we need to copy subfolders at the same time – because that would be very convenient. This is where the power of ROBOCOPY’s switches comes in.
We’re going to use the /s option (which copies all subdirectories – regardless of content. If you don’t want to copy empty folders or directories over, you can use /e
So the command looks like:
ROBOCOPY "C:PHOTOS" "D:BACKUP" /s
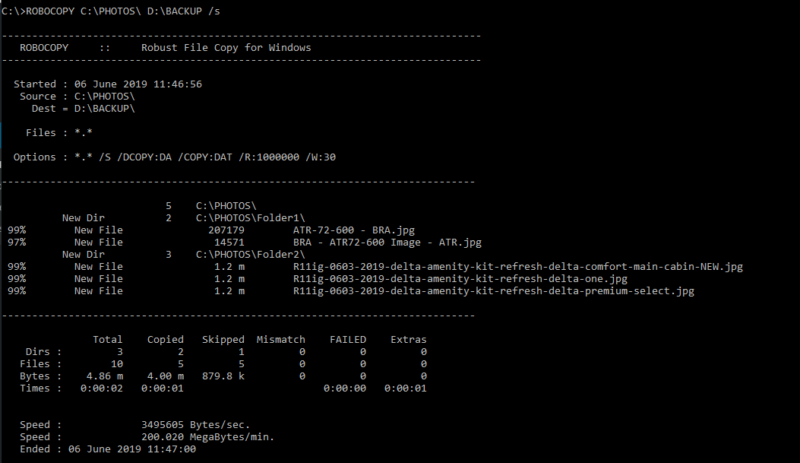 You'll note also the copy has skipped some files as they already exist on the disk
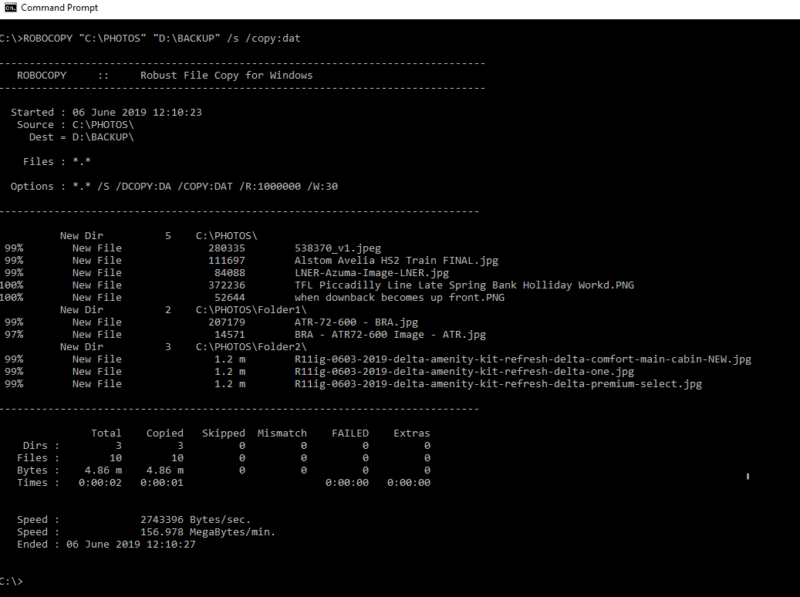
Next, we need to ensure the file attributes are copied over as well. This will vary on your circumstances – but I like to keep any attributes I’ve set (Like read-only, the time of the original write of the file and time). Therefore, I’m using /COPY:DAT (to grab the attributes I want)
ROBOCOPY "C:PHOTOS" "D:BACKUP" /s /copy:DAT
So, files, directories, attributes. All well and good. If I wanted to move the files instead of copying them I can use the /move switch. I do not tend to do this – rather than copying, then deleting.
ROBOCOPY "C:PHOTOSDOCUMENTS" "D:BACKUP" /s /move
Your personal methodology and data risks apply. And don’t whine at me if you delete the wrong data by accident.
If you don’t want to congest your home network with data during the daytime, and want to do the copies when you’re asleep, I can also set the time it can run too – for example using /rh:hhmm-hhmm switch. Optional, but useful.
ROBOCOPY "C:PHOTOS" "D:BACKUP" /s /copy:DAT /rh:2200-0700
So, we’re copying the data, folders, attributes and running the copy in the off hours.
Next, we’re going to add retry and wait times – because when a file goes wrong and a disk can’t be read – or if the file is in use, you don’t want to stop your backup.
I tend to use /w:0 and /r:0 – ie no wait and no retries to make the error log readable. Again – your mileage may vary.
ROBOCOPY "C:PHOTOS" "D:BACKUP" /s /copy:DAT /w:0 /r:0
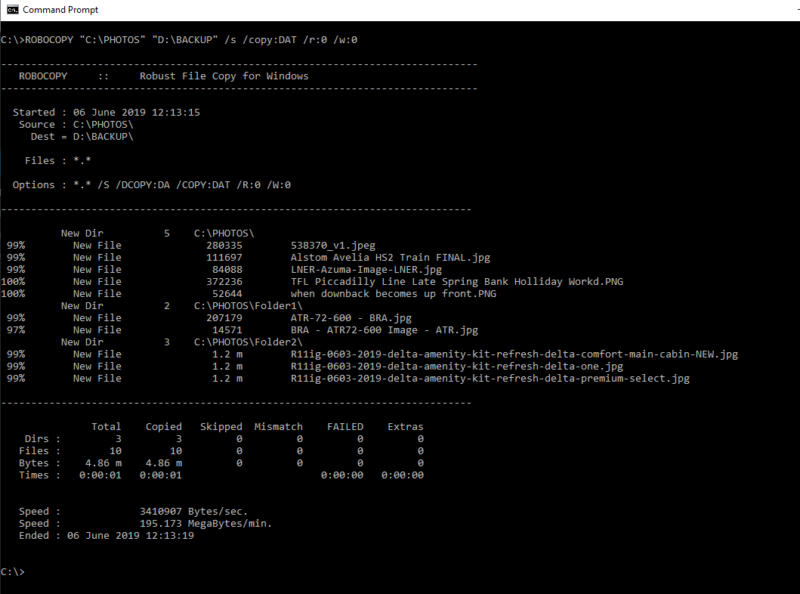
You’ll also notice at the end of every copy, you can see what has been copied, skipped, mismatched, failed or additional data. Good for a lot of purposes
Finally, we’re going to add some logging too, so if something does go wrong, we can go through the log, scratch our heads and see what comes out.
We are going to use a few switches at once here to build our logging:
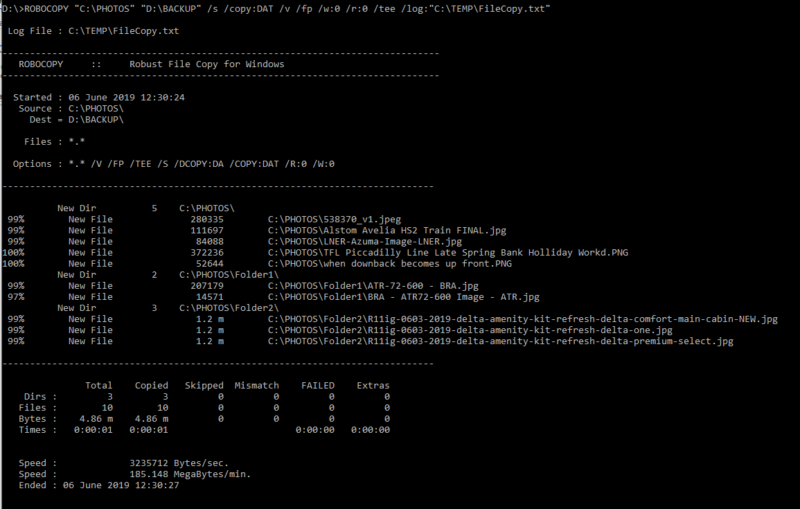
- /v – switch on verbose mode – so the computer tells us what’s going on
- /fp – show the full path where files are copying from (useful for diagnostics later)
- /tee – sends log output to the screen
- /log<filename> – Creates a log file so you can go over the operation later.
Let’s build this out for the copy I’m going to use here
ROBOCOPY "C:PHOTOS" "D:BACKUP" /s /copy:DAT /v /fp /w:0 /r:0 /tee /log:"C:TEMPFileCopy.txt"
I did say write this in Notepad, didn’t I? This is why.
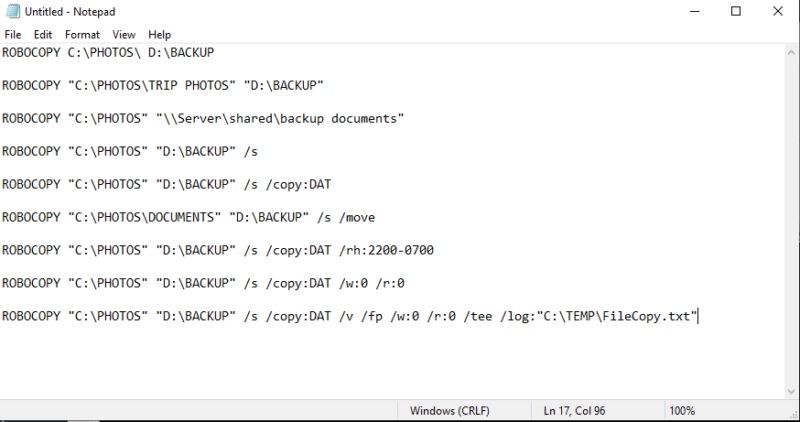
Never underestimate the power of Notepad. You can use Notetab Light, Notepad++ and so on, but sometimes the simplest text editor is the best.
What did the copy look like on the existing file server?
It was ugly, to say the least. Put it like this – even with 1Gbit Ethernet in the flat, it was… a slow old process to shimmy data from external disks onto the new storage. Here are just a few copies going, mainly as I wanted to push the network bandwidth
Here are some entertaining screen grabs.
Well to start with, here’s the configuration of the Drobo at build:
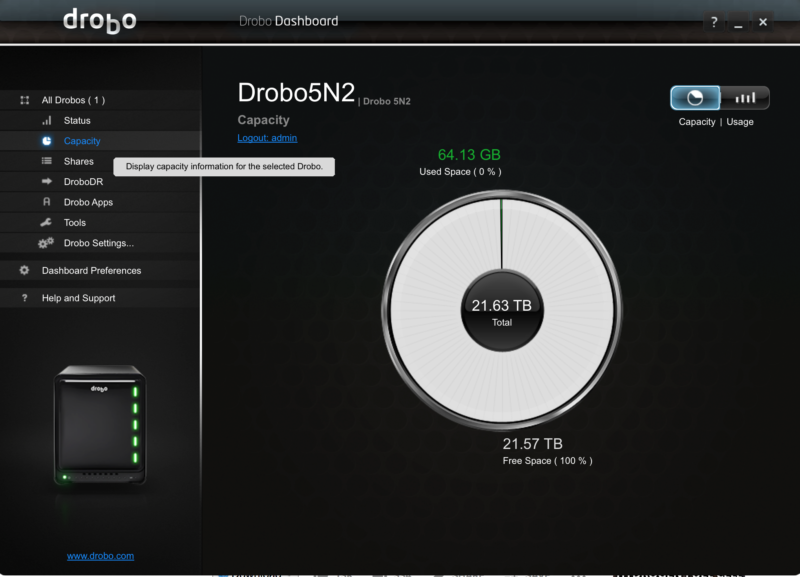
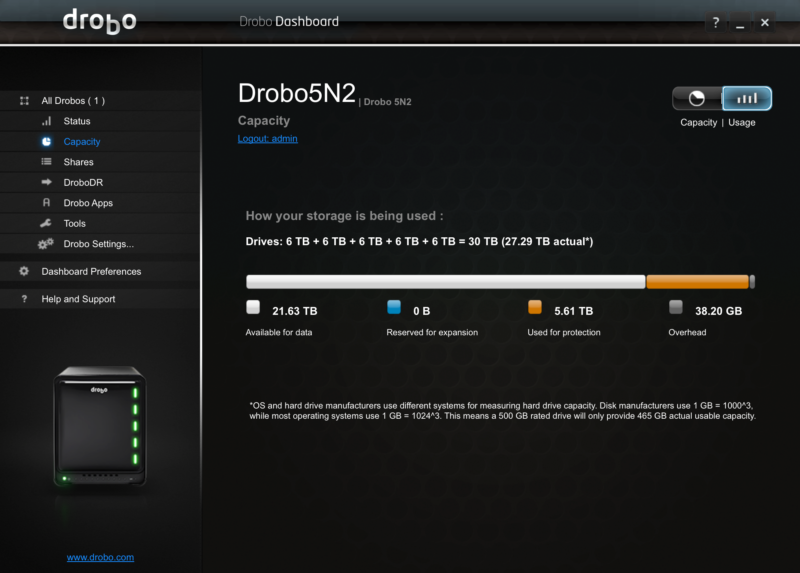
21.57Tb of formatted storage, with 5.61Tb as protection.
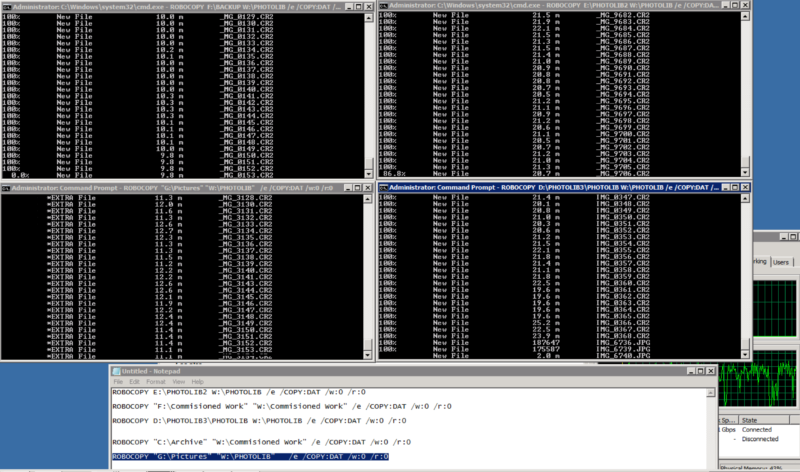
I went more than a little mad – it was easier just to let the copies work when I needed to go out and do other things. And work they did – as some copes took a lot of time to come over. It kept the USB bus and Ethernet connectivity at peak too.
.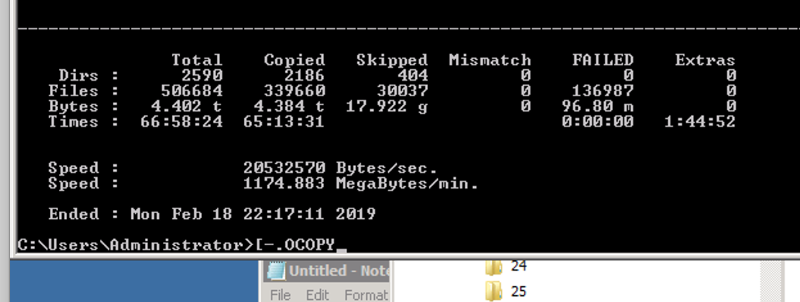
Yes – it’s a lot of data shifting. The joy of copies, preexisting data and Apple extra things you don’t need in a file share.
Other tools
There are a plethora of other windows copy tools out there to help you. Such examples include:
- FastCopy https://fastcopy.jp/en/ (GPL)
- Teracopy http://codesector.com/teracopy (Freemium)
- UltraCopier – http://ultracopier.first-world.info/ (GPL)
I’ve used FastCopy and found it to be basic, but it does the job. If you’re uncomfortable using RoboCopy, this is a good start. The rest I’ve played with – but have no thoughts either way to them
Wait, you use Robocopy in the real world?
More often than you think. I find it’s a great tool when doing file and data migrations because of the logging abilities, as well as the speed it can copy too.
And I’m not talking about just a few gigs – I’ve done multi-hundred-gigabyte copies with this.
Put simply – this just works. And when you’re working in the datacenter trying to get data from one place to another – sometimes using external disks, sometimes from server to server with a tool you can manage, schedule and log with – it becomes a valuable proposition very quickly.
FULL DISCLAIMER
Whilst I’ve tested these instructions in test harnesses and situations, your situation will be different from mine, and you WILL have to tweak the commands to your needs.
These instructions are provided on an “as-is” basis, with no warranty offered or implied, and are used at your own risk.
In other words, if you use these instructions and it deletes your data – don’t come crying to me.
Next: Backups or issues with a backup.. or “What’s a backup strategy”?
Welcome to Economy Class and Beyond – Your no-nonsense guide to network news, honest reviews, with in-depth coverage, unique research as well as the humour and madness as I only know how to deliver.
Follow me on Twitter at @EconomyBeyond for the latest updates! You can also follow me on Instagram too!
Also remember that as well as being part of BoardingArea, we’re also part of BoardingArea.eu, delivering frequent flyer news, miles and points to the European Frequent Flyer.
Reminds me of XXCOPY. I liked to keep that in my digital back-pocket in case I needed an XCOPY-on-steroids. Sad the creator passed away though.
does the /DAT switch keep the original timestamp and dates of the files? or does the copied (target) version of the file have a timestamp of” right now today”
/DAT will keep the original date/time stamp on the file.